Valentine’s Day is just around the corner, and while love might be in the air, it should also be on your nails! For beauty enthusiasts and nail art lovers, this special day is an opportunity to flaunt creative, romantic designs that make a statement. From classic reds to trendy heart patterns, your nails can be the ultimate accessory that ties your Valentine’s look together.
This guide will walk you through the hottest Valentine’s Day nail trends, step-by-step DIY tutorials to achieve them at home, essential nail care tips, and must-have tools to create your perfect manicure. Plus, we’ll feature real-life inspiration to spark your creativity. Whether you’re a beginner or a nail pro, there’s something here for everyone!
Classic and Trending Valentine’s Day Nail Designs
Want gorgeous nails worthy of Cupid’s attention? Start with these timeless classics and trendy designs:
1. The Classic Red Nail
Red is the color of passion, and a glossy red manicure is perfect for Valentine’s Day. Bring the look to life with a single bold shade or add a twist with glittery accents.
2. Pretty in Pink
Pink hues, from soft pastels to bold fuchsias, are always a hit. Mix and match shades for an ombre effect or add subtle polka dots for a playful vibe.
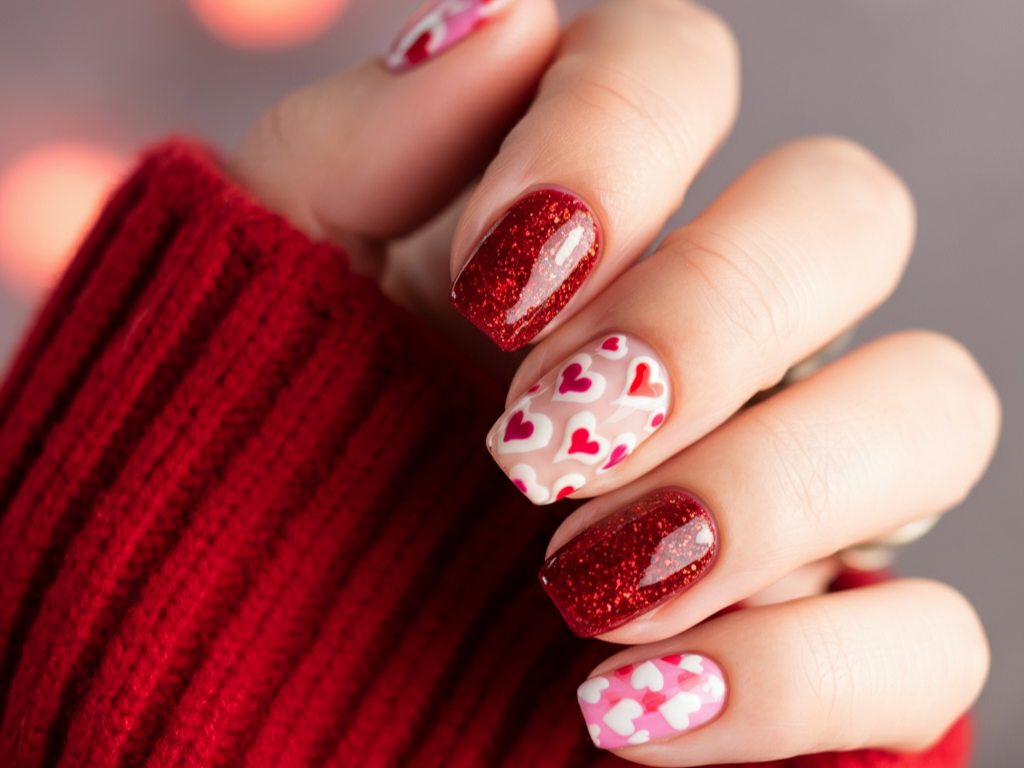
3. Heart-Themed Nails
What’s Valentine’s Day without hearts? Whether you want a minimalist touch with tiny hearts on a neutral base or a bold design with oversized red and white hearts, this is an adorable way to show your love.
4. French Manicure with a Romantic Twist
Take the classic French mani up a notch by swapping white tips for red, pink, or glittery accents. This chic yet subtle design complements any outfit.
5. Love Letter Nails
Paint small, handwritten “love” messages and delicate envelopes on your nails using thin brushes for a cute, vintage-inspired look.
6. Statement Glitter Nails
Want some sparkle? Glitter nails—either as a full coat or as an accent nail—add a touch of glam to your Valentine’s aesthetic.
Step-by-Step Guide to Valentine’s Day Nail Art at Home
Whether you’re a nail art newbie or a seasoned pro, follow this step-by-step guide to achieve flawless nail designs. Here are three designs to get you started:
1 Design – Red Heart Tips
- Prep Your Nails:
- Trim and shape your nails into a square or oval shape.
- Buff the surface and apply a base coat.
- Create the Red Tips:
- Use a thin nail brush to draw two rounded arcs on each nail’s tip—this forms the heart shape.
- Fill in the shape with a red polish for a solid design.
- Seal the Look:
- Wait for the design to dry completely, then apply a clear top coat for shine and durability.
2 Design – Pink Ombre with Glitter
- Base Coat:
- Apply a sheer nude or light pink polish as your base.
- Ombre Effect:
- Dip a makeup sponge into two shades of pink polish, blending the colors.
- Dab the sponge gently onto your nail for a gradient effect.
- Add Glitter:
- While the polish is still slightly wet, apply glitter to the tips.
- Top Coat:
- Finish with a top coat to smooth out the texture.
3 Design – Love Letter Nails
- Neutral Base:
- Apply two coats of a neutral beige or nude polish.
- Tiny Envelopes:
- Using a thin brush, paint a small white triangle for the envelope.
- Outline the triangle with black polish for detail.
- Message on Nails:
- Write “LOVE” or draw small hearts using a detail brush.
- Seal with Top Coat:
- Finish it off with a glossy top coat to protect your design.
Tips for Nail Care and Long-Lasting Designs
To keep your Valentine’s Day nails looking flawless:
- Prep Your Nails thoroughly before applying polish. Clean, buff, and apply a strong base coat.
- Use Quality Products to ensure smoother application and longer-lasting designs.
- Apply Thin Layers of polish. Multiple thin coats dry better than one thick coat.
- Invest in a Top Coat for shine and protection from chips.
- Keep Your Hands Hydrated with cuticle oil and hand cream.
Essential Nail Art Tools and Products
Creating stunning Valentine’s Day nails starts with the right tools and products. Here are our top recommendations:
- Nail Polish:
- Essie in “Forever Yummy” (for classic red)
- OPI in “Not Your Average Pink”
- Zoya Pixie Dust (for glitter looks)
- Tools:
- Thin nail brushes for detail work
- A dotting tool for perfect polka dots
- Makeup sponges for ombre designs
- Top and Base Coats:
- Sally Hansen Double Duty Base & Top Coat
- Seche Vite Dry Fast Top Coat
- Nail Care:
- Cuticle oil (try CND SolarOil)
- Soft nail buffers and files
Inspirational Galleries for Valentine’s Day Nails
Need some visual inspiration? We’ve rounded up stunning real-life Valentine’s Day nail looks to spark your creativity. Browse through these ideas from social media and pro nail artists to find your perfect design:
- Minimalistic love hearts on a nude base—perfect for a soft, romantic vibe.
- Red and gold glitter gradient nails for a glamorous statement.
- Pink pastels with floral and heart accents for a feminine, playful look.
Follow [Brand Name’s Social Media Handle] to check out our Valentine’s nail art gallery and get inspired by more designs!
Wrap Yourself in Love, One Nail at a Time
Valentine’s Day is all about celebrating love—and what better way to express yourself than through standout nail art? Whether you’re planning a romantic date night or a Galentine’s get-together, your nails can steal the spotlight.
Once you’ve created your designs, we’d love to see your work! Tag us on social media using #ValentinesDayNails, and don’t forget to share your favorite tips and tricks in our growing nail art community.
Gather your tools, pick your favorite design, and get ready to dazzle this Valentine’s Day. Happy painting!